3D Production: Animation

The process of animating in a 3D production pipeline is using the rigged character model to create sequences of movement which can be accompanied by audio or scene assembly in later production stages.
Characters may possibly be animated in sections, working on different areas of animation, starting with gross body movements, adding subtle enhancements afterwards and then finishing with more complex procedures such as facial animation and expression (Winder, 2002).

One method of animation using 3D models is by cutting the process short with ‘keyframes.’ Typical frame rates vary between 24 to 30 frames per second, depending on the format (Chopine, 2012, p. 111). Keyframes clarify the beginning and end of key poses within the animated sequence, spanning from position, rotation, size, deformation, colour, and texture. These ‘in-between’ frames follow the choreography (movement and facial expressions) as manipulated by the animators, who also organise timing. Similar to a storyboard, keyframes depict the main points of action whilst the computer program ‘fills in’ the remaining frames. This short, animated sequence is often adjusted several times before being completed (Vardanega, 2013).

large

Examples of keyframes (first and last poses) and ‘filled-in’  frames. Retrieved from http://ieeexplore.ieee.org/ieee_pilot/articles/05/ttg2009050853/figures.html

Occasionally animators will manipulate objects on a frame-by-frame basis to accommodate the scene requirements or during complex animations, such as a walk cycle (Baker, 2015).

2rhyd882rhyd881

Retrieved from http://nelregnodeidraghi.forumfree.it/ 

Other methods include placing the rigged object models on splines, which then follow a set curved path, importing motion capture data into the animating program and using it on a character rig or using a 3D application’s built-in physics engine for applying basic gravitational forces to the character rig (Mediafreaks, n.d.).

Further reading… http://www.cgmeetup.net/home/timing-and-spacing-in-animation/

The motion capture method of animation allows a performer to drive the innate animation of a character, usually performed with a skintight suit, with markers that correspond to joints, allowing a computer program to digital record movement (Chopine, 2012, p. 115). This allows for realistic human movement, without requiring the detail, time and cost of keyframing. The limitations of this technology, however, include limbs not directly interacting with the environment, and the intended character model having different facial and bodily structure, meaning that tweaking is needed, often done so by animators (Chopine, 2012, p. 115).

References used: 

Chopine, A., 3D Art Essentials: The Fundamentals of 3D Modeling, Texturing, and Animation. Focal Press.

Baker, M. (2015) 3D Theory – Keyframe animation, Euclidean Space. Retrieved from http://www.euclideanspace.com/threed/animation/keyframing/

Mediafreaks, (n.d.) The Process of 3D Animation, Retrieved from http://media-freaks.com/the-process-of-3d-animation/ >

Vardanega, J., (2013) Pixar’s Animation Process. Retrieved from http://pixar-animation.weebly.com/pixars-animation-process.html >

Winder, C., (2002) Producing Animation: The 3D CGI Production Process. Retrieved from http://www.awn.com/animationworld/producing-animation-3d-cgi-production-process >

Rigging

Without adding rigging, a three dimensional remains a static 3D mesh, which cannot be posed, etc. (which is obviously required for animating). The model thus must be connected to a “digital skeleton” before their joints can be deformed and changed in the manner needed to create an animation. The skeleton of a 3D model, much like an organic one, is bound with a series of joints and bones – acting as the points of articulation for control of the model (Pluralsight, 2014), which can be manipulated into a desired pose.

skin2a

Retrieved from https://lynchag.wordpress.com/2014/02/23/raycast-based-auto-rigging-method-for-humanoid-meshes/

To create a successful rig, the hierarchy of the skeleton must follow a logical order, with the bones and joints tapering off the first joint – also known as the root joint – similar to an actual skeleton. From the root joint, subsequent joints either join directly or are bound through another joint (Slick, 2016). For example, the forearm is lower in the hierarchy than the upper arm, and the wrist is lower than that, like in the figure shown below.

cool


(Chopine, 2012, p. 85)

Before the movement can be changed, the bones of the digital skeleton (or rig) must be bound to the 3D mesh itself, in a process called skinning, or binding (Pluralsight, 2014). This allows the joints on the mesh to follow the skeleton joints – and without this, the movement of the rig will have no influence on the model.

Joint movement can be calculated through two methods – forward kinematics and inverse kinematics. When animating with inverse kinematics means the child node, when moved, influences the movement of the parent joints, automatically interpolated by the software (Slick, 2016). The position of the rest of the hierarchy is calculated automatically. It is typically at this point that animators will have to use forward kinematics to tweak the pose for the final shot.

Animating with forward kinematics, at its most basic, means that the character rig will follow the hierarchal chain (Pluralsight, 2014). Despite having more control over the chain, the problem occurs when animators need to position each joint in the chain independently. For example, when moving a foot, instead of having the rest of the limb follow, the knee and ankle joints would need to be moved individually, taking more time than if one were to use inverse kinematics (Pitzel, 2011). It is comparable to animating a stop-motion armature. This process can lead to difficulties when animating a walk cycle, such as keeping feet from sliding on the ground, sinking into it, floating, or even disconnecting entirely (Ami, 2012, p. 92)

18139_skeleton_forward
*Using FK, the object at the bottom of the hierarchy stays still whilst the objects above it are moved.

Once again drawing a parallel to a real skeleton, a rigged skeleton has a degree of constraints – joint constraints, set up whilst building the rig, can help add realism to a model. These limit the object’s radius of rotation, the amount of axis it can or can’t rotate and the status of the constraint (whether it is a parent or child). This step must be completed before control curves can be used on the rig (Ami, 2012, p. 91). Control curves (typically simple NURBS curves) are placed outside the character so that the curve can be selected to position the character, rather than individual joints (Pluralsight, 2014).

The “squash and stretch” feature allows the rig to support squashing and stretching of the model, which may be allowed or not depending on the intended realism of the animation. The squash and stretch features are typically used in cartoon animation (Slick, 2016).

Due to such a complex nature, the faces of the models are rigged using controls separate to the main motion controls, in a specialised process called facial rigging, mainly because the typical joint controls aren’t well suited. Facial rigging typically required deformers and blend shapes (or morph targets) to create the finished product. Blend shapes allow the shape of one object to change into the shape of another object, typically used for setting up facial animations, whilst deformers can move large sections of vertices on the model, often used for cheeks or eyebrows (Pluralsight, 2014).

Once the rigging is complete, the artist can move onto animating!

References:

Chopine, A. (2012) 3D Art Essentials: The Fundamentals of 3D Modeling, Texturing, and Animation. Focal Press.

Pitzel, S., (2011) Character Animation: Skeletons and Inverse Kinematics. Retrieved from https://software.intel.com/en-us/articles/character-animation-skeletons-and-inverse-kinematics

Pluralsight (2014) Key 3D Rigging Terms to Get You Moving, Retrieved from https://www.pluralsight.com/blog/film-games/key-rigging-terms-get-moving

Slick, J., (2016) What is Rigging? Preparing a 3D Model for Animation. Retrieved from https://www.lifewire.com/what-is-rigging-2095

Textures & Shaders

Header image retrieved from http://abeloroz.deviantart.com/art/Texturing-Practice-379916683

To create a realistic or visually appealing model, texture artists apply surface and colour properties to the complex character / object models created from the modelling stage. The textures themselves are two dimensional image files, applied to the surface of the model through a process called texture mapping. Texturing and shading are used in conjunction to develop the model’s aesthetics depending on style or realism (textures may range from photorealism to flat colours) of the 3D animation itself. Although textures may be derived from photographs, it is common amongst the industry for artists to hand-paint textures in digital programs such as Adobe Photoshop, (Beane, 2012). Programs like Mudbox also allow artists to paint during the modelling process.

making-plants-2a

Retrieved from http://3dmodeling4business.com/blog/

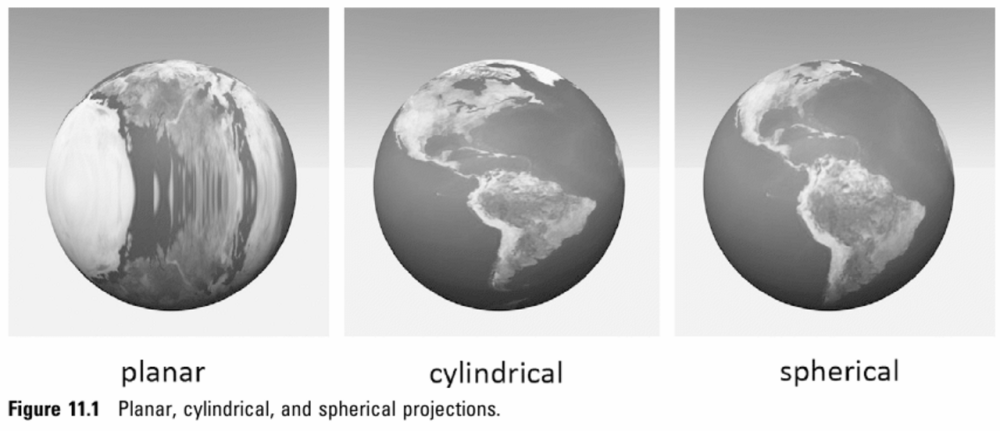
One method of transferring a texture to the surface is through planar projection, wherein an image is projected onto the surface, comparable to how a movie projector projects onto a surface (Chopine, 2012, p. 152), which is then able to rotated or moved until the desired effect is achieved. Once again likening to a movie projector, when using planar projection on a non-planar surface, the may become warped or distorted.

Cube, or box projection, is a method wherein the texture is divided into six individual squares, then folded up into a cube, and projected onto the surface, whilst cylindrical projection ‘rolls’ the image into a cylinder before projection (Chopine, 2012, p. 152).

cool23

Retrieved from Chopine, 2012, p. 152.

To add photorealism to the object, algorithms called texture maps (also known as ‘shaders’) are added to apply colour, texture, or specialised surface details such as glossiness, reflectivity and transparency (Slick, 2016), giving them the appearance of an object with three dimensional depth. The UV co-ordinates achieved in the previous step (UV mapping) correspond to the textures laid on the surface of the model. Artists may additionally use UV co-ordinates on a semi-transparent layer as a guide for where to place details (Slick, 2016).

03fig06

Retrieved from http://www.informit.com/articles/article.aspx?p=2162089&seqNum=2 

Colour, or “diffuse” maps add colour or texture to the surface of the model, and is the most basic of texture maps. Specular maps, or “gloss” maps can alter the glossiness of the surface, and is particularly useful for shiny surfaces (e.g. ceramics, metals), whilst a bump or “displacement” map helps to indicate impressions or depressions (Slick, 2016). Other maps include transparency and reflection maps (the clues are in the name).

References:

Beane, A. (2012) 3D Animation Essentials, John Wiley & Sons. Retrieved from https://books.google.com.au/books?id=62FrKLO2M3AC&source=gbs_navlinks_s

Chopine, A. (2012) 3D Art Essentials: The Fundamentals of 3D Modeling, Texturing, and Animation. Focal Press.

Geig, M. (2013) Working with Models, Materials and Textures in Unity Game Development, Retrieved from http://www.informit.com/articles/article.aspx?p=2162089&seqNum=2

Slick, J., (2016) Surfacing 101 – The Basics of Texture Mapping. Retrieved from https://www.lifewire.com/texture-mapping-1956

UV Mapping

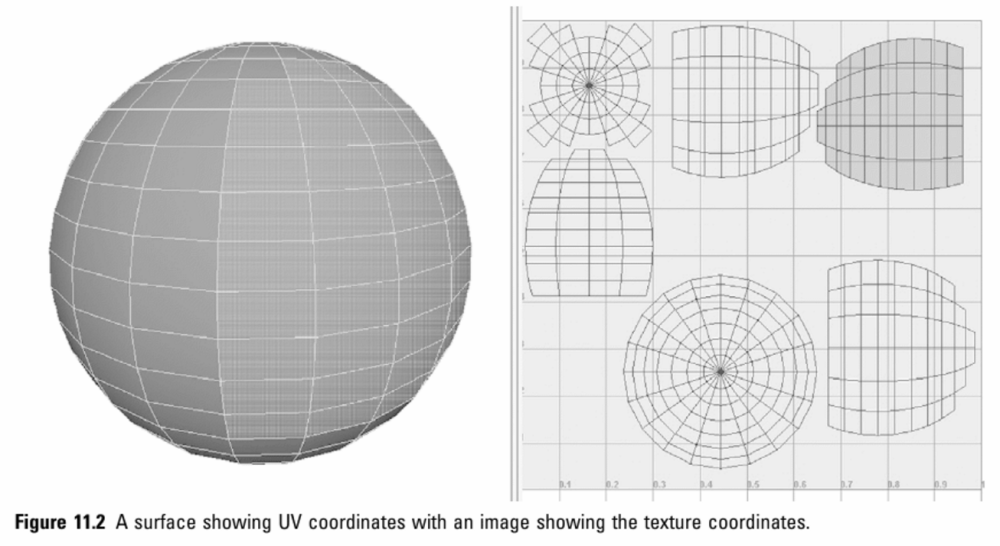
The process of applying two-dimensional images onto the surface of a three-dimensional object is called UV mapping. UVs themselves are textures that co-ordinate with vertex component information (Pluralsight, 2014) – existing to define a two-dimensional texture co-ordinating a system called “UV texture space,” using the letters U and V to indicate the axes in 2D (Autodesk, 2017), with U corresponding to horizontal or latitude and V to vertical or longitude. These co-ordinates control the placement of the points on the image texture to that of the surface mesh, and are assigned to every vertex, and are known as texture coordinates (Chopine, 2012, p. 153).

cool3

Retrieved from Chopin, 2012, p.154.

In a polygon surface type (which is most common amongst 3D modelling programs) UVs atypically exist by default, and must be created and/or subsequently modified so that the surface mesh adapts to the texture map (Autodesk, 2017).

To actually apply the images, a polygonal face must be allocated a set of UV co-ordinates from the image plane in a process called unwrapping. The UV coordinates are visually exported into a square bitmap image that varies in size, which is then used as a layout for the texture files (Slick, 2016).

uv-unwrap

The process of unwrapping.
Retrieved from http://goanna.cs.rmit.edu.au/~gl/teaching/Interactive3D/2012/lecture9.html (18/02/17)

Creating the UV Layout:

Projection of the UV layout can be applied to selected faces using two methods, (depending the shape of the object) planar projection or cylindrical projection, (Slick, 2016).

  • Flat surfaces make use of the planar projection technique, where the image is applied directly to one face. This can flatten all the way through the model, so objects with multiple faces would have UVs stacked over each other.
  • Curved surfaces make use of cylindrical projection which wraps around the entire object. Artists change the object manually as most surfaces are projected automatically.

In basic terms, the image texture maps are placed on a 3D object using a process called UV mapping. This process correlates the image and its appearance when mapped onto a 3D object.

lol_vayne_fin_construction

Retrieved from http://polycount.com/discussion/143240/riot-art-contest-vayne

The UVs themselves are the co-ordinates, whilst their placement is administered by a co-ordinating system called the UV Texture Space. UVs appear as a flattened image, representing the texture to be placed on the surface mesh. This skill is crucial for mapping realistic textures onto polygonal surfaces.

Some other 3D applications and plugins (e.g. Mudbox) allow artists to paint directly onto 3D objects without unwrapping, with the application automatically setting up the UV co-ordinates in correlation to the texture (Chopine, 2012, p. 157).

References used:

Autodesk, (2017) Introduction to UV Mapping. Retrieved from https://knowledge.autodesk.com/support/maya/learn-explore/caas/CloudHelp/cloudhelp/2015/ENU/Maya/files/UV-mapping-overview-Introduction-to-UV-mapping-htm.html

Chopine, A. (2012) 3D Art Essentials: The Fundamentals of 3D Modeling, Texturing, and Animation. Focal Press.

Pluralsight, (2014) Understanding UVs – Love Them or Hate Them, They’re Essential to Know. Retrieved from https://www.pluralsight.com/blog/film-games/understanding-uvs-love-them-or-hate-them-theyre-essential-to-know

Slick, J., (2016) Surfacing 101: Creating a UV Layout. Retrieved from https://www.lifewire.com/creating-a-uv-layout-1955

Entering the Production Stages: 3D Modelling

Header image retrieved from http://bryanwynia.blogspot.com.au/

With the groundwork of the pre-production stages completed, the project is ready to evolve from a solid concept to the basics of a working 3D animation project. Modelling breathes life into the ideas put forward – environments, props, characters. The manner in which these assets are created should heavily reflect the styling of the concepts put forward in the pre-production stage, ensuring a degree of continuity between planning and execution. The combination of reference materials, concept art and design notes gathered prior create a perfect recipe for a well-made 3D model.

Polygonal modelling tends to be the most common method of creating 3D models within the games, animation and film industries (Slick, 2016). Artists can use industry standard programs such as 3Ds Max or Maya to build on from low polygonal shapes into more complex forms. Although relatively new to the animation scene, sculpting applications such as ZBrush and Mudbox allow for more specific details within models (Boudon, G., 2014).

The place where two different faces interact within a polygonal model is called an edge, whilst a point of intersection between three or more edges is called a vertex (Slick, 2016). The connections between vertices, faces and edges are mapped out to form a “mesh,” – a plot that defines the shape of the object.

Further reading on components of polygonal modelling… https://www.lifewire.com/3d-model-components-1952

During its infancy, a 3D model is comprised of the most basic of geometic shapes, originating as simple objects like cubes or cylinders, known as object primitives. Manipulating the current model into a recognisable prop or character can be achieved through a series of common modelling techniques, which can differ from cutting into the object to building on top of it.

Low resolution shapes can be fashioned into complex shapes using a technique called box modelling. This technique sees scale and rotate tools used in succession with extrusion and intrusion of certain areas. Subdividing the surface to increase polygonal resolution or edge loops (set of connected edges across the surface of the object) can help to maximise detail (Slick, 2016).

3box

Retrieved from http://unit66gj.blogspot.com.au/2014/01/ha4-task-4-mesh-construction.html

Further reading… https://www.lifewire.com/polygonal-3d-modeling-2139

Digital sculpting, which majors in programs like Mudbox and ZBrush, can be likened to moulding a set of digital clay. Much like its traditional counterpart, artists can use tools to “pinch” and “pull” the surface of the object without the limitations of other modelling programs. This organic process has allowed natural-looking models to be made with a high degree of surface detail and polygon count.

wolf02

An example of a base mesh being sculpted through various stages. Retrieved from http://www.3dartistonline.com/news/2015/04/create-a-terrifying-werewolf-in-zbrush-and-3ds-max/

Despite allowing a model to retain a high level of detail, a high polygon count may cause the program to slow, or even crash entirely.

Although used to a lesser degree, spline or “NURBS” modelling, in contrast to box modelling, works with two or more curves, whilst the program “fills in” the neutral spaces. The mesh is absent of faces, edges and vertices, and comprised of ‘smoothly interpreted surfaces…’ (Slick, 2016).

A more arduous process of 3-D modelling, edge or contour modelling is constructed with individual loops of polygonal faces along the prominent contours of an object, filling in remaining gaps. This technique is reserved for high specified meshes, such as human faces, which are difficult to achieve through typical box modelling (Slick, 2016).

Rather than trying shape a well-defined eye socket from a solid polygonal cube (which is confusing and counter-intuitive), it’s much easier to build an outline of the eye and then model the rest from there…” (Slick, 2016).

Once the blank models match their pre-production vision, the project can advance to UV mapping, the next step in the production pipeline.

Other references:

Sculpteo, (2017) 3D Modelling: Creating 3D Objects, Retrieved from https://www.sculpteo.com/en/glossary/3d-modeling-definition/

Slick, J., (2016) 3D Model Components – Vertices, Edges, Polygons & More, Retrieved from https://www.lifewire.com/3d-model-components-1952

Slick, J., (2016) 7 Common Modelling Techniques for Film and Games: An Introduction to 3D Modelling Techniques. Retrieved from https://www.lifewire.com/common-modeling-techniques-for-film-1953

Slick, J., (2016) Box Modelling Technique Defined. Retrieved from https://www.lifewire.com/box-modeling-2150

Constructing an Effective 3D Production Pipeline: The Pre-Production Stage

The production of a 3D project is divisible into three distinct stages; the pre-production, production and post production, further divisible by sub-stages such as modelling and mapping.

project-pipeline-pipea-926d

Retrieved from http://advaita-studios.com/ist-film/ 

In keeping with chronological order, pre-production will be discussed first.

As it is with any development in film or other media, the core of a project – themes, style, setting –  matures during its early development. Dreams comes to fruition, are discarded and rebuilt upon during this crucial exploration. Ideas are moulded and refined whilst the design for the story concepts, animation style, characters and other features begin to take form.

Just like any task, planning is key. Setting the foundations for the project during this stage prevents ideas from wavering too far from their original goal, meaning artists and other personnel are on the same wavelength. These unofficial parameters allow for a production space free of miscommunication and other difficulties, allowing for increased productivity and accessibility.

Although approaches to planning can differ between projects, generally, this planning phase can see the emergence of screenplays (if required), rough character design, storyboarding, timing sheets, model sheets and refined animatics.


hades2bdialog244

Retrieved from http://livlily.blogspot.com.au/2010/10/hercules-1997.html 

At this stage, characters go through several iterations before transitioning into the modelling stage. Character continuity plays a large role in the success of a film, and so standardized character sheets are essential for any animation, especially those with multiple artists, or in the 2D genre. These can detail intricacies such as anatomy studies, default poses and expression that help to build character personality in preparation for the final project.


Storyboarding can be likened to a “blueprint” of the action and project. After the creation of the screenplay (if required), characters are mapped out into a series of rough sketches, comparable to a comic strip. Essentials such as camera angles and edits are selected. These sequences are reviewed by directors or those with similar roles and subject to change if necessary.

After developing the storyboard, more polished progression, such as an animatic, often called a “storyboard reel”, can take place. Rather than being a frame-by-frame animation, an animatic encapsulates the essentials of the scenes, detailing certain areas, namely expression and movement. The flow of time and action can be assessed if done well. Animatics can additionally be accompanied by voice acting if required by the project.

Preparation during project organization allows ideas and creativity to flourish whilst within the boundaries of effective time management and team coordination. A strong sense of direction not only motivates workers, but reduces the risk of failure during the final stages of production, and is no doubt essential to a successive pipeline.


Other References:

Boudon, G., (2014) Understanding a 3D Production Pipeline – Learning the Basics. Retrieved from http://blog.digitaltutors.com/understanding-a-3d-production-pipeline-learning-the-basics/

Seibold, W., (2011) Free Film School #23: Animation, The Twelve Step Program. Retrieved from http://www.craveonline.com/site/178563-free-film-school-23-animation-the-twelve-step-program

Upcoming VFX Movies, (2014) 3D Production Pipeline (Pixar vs. Dreamworks). Retrieved from http://www.upcomingvfxmovies.com/2014/03/3d-production-pipeline-pixar-vs-dreamworks/

Veetil Digital Service, (2014) Pre-Production, Production & Post Production Processes in 3D Animation. Retrieved from http://www.slideshare.net/Veetildigital/pre-productionpost-process-in-3d-animation

Media & Identity

*Header image made by me.

Media and morality are interlinked. Anything from moral conviction to changing social attitudes can be expressed – visually, lyrically, literally. For me, media is intrinsically linked to the moral development of viewers especially in the way it challenges people to rethink the ideas presented within it.

When we cross into the morally grey threshold in film and animation, we begin to start questioning whether or not the depictions of morally wrong behaviour through media is glorifying, or at its worst, condoning.
 When A Clockwork Orange was released, the UK media reported a spree of alleged copy-cat crimes, where a 16-year-old boy had beaten someone to death in a manner mirroring that of the film (Bugge, 2013). Coincidence, or influence? Can the fictional world of violence really drive people to commit similar atrocities?

It’s no denying that, to some extent, media that we expose ourselves to influence our moral convictions – positively or negatively. A network report in 2010 revealed that positive representations of LGBT characters on television led to a noticeable change in attitudes towards them (GLAAD, 2010).

Exploring the confines of what is considered socially or morally acceptable is critical to the freedom of media, and particularly what drew me to watch, read, listen and create. Inventing stories and creating characters isn’t just about creativity – it’s about challenging human nature.

My own take on this is a developmental story arc hopefully transitioning into a web-comic, featuring short animatics, within the next year or so. Rather than relying on preconceptions, it forces you to look beyond the first layer and delve into individual morality. An angel with a cause to protect his people jeopardises the lives of others; a crime so immense that revenge is the only absolute course of action; grief blinding a demon beyond any ability to make a rational decision – is any of it justified? Depends on your perspective, which is exactly what I want audiences to explore within the narrative.

The core of a great media piece is not only the story, but the themes behind it – the message that transcends all cultural and political boundaries within the universe. Ambition and downfall in Macbeth, censorship and illusion of freedom in 1984. Media itself is an untapped reservoir of influencing potential, and when bound by the laws of creative freedom, it’s available for anyone to take advantage of, and it’s something that people in the film and animation industries have been tackling for decades. Good job team. 

Further reading…………….http://mediasmarts.ca/blog/media-and-morality

References used:

Bugge, C., (2013) The Clockwork Controvesy, The Kubrick Site. Retrieved from http://www.visual-memory.co.uk/amk/doc/0012.html

2009-2010 Network Responsibility Index, (2010) GLAAD. Retrieved from http://www.glaad.org/files/NRI2010.pdf

Image retrieved from http://411posters.com/2016/04/a-clockwork-orange-by-nikita-kaun/ 

What brought me here?

*Header image by me!

It is hard to pinpoint one’s creative ingenuity and desire to produce on a single artist or movement…For me at least, it’s always been the freedom of expression that drew me into the creative industry.

It’s the limitless nature of media that is so intriguing to me, the things we can do – challenging the ways we perceive social norms; values, social critique, exploring the boundaries of morality, exposing fraudulent and heavy power imbalances, disassembling the hierarchy of human nature and construction of emotion, challenging the amount of empathy we should or shouldn’t provide – all within the comfort and freedom of a fictional universe. It’s not an everyday person that unmasks the false reality around us – we can’t all be Julian Assange and disclose thousands of government secrets – but it’s everyday people that explore, challenge and debunk these concepts through media.

Take, Avatar, for example. Not the blue people, I’m talking Avatar: The Last Airbender, one of the most compelling and rich animated series of the last few decades. It unearths the tales of immigrants, torn from their own country and heritage through war with the complexity and individualism amongst each character rarely seen in this form of media. Immigration within our own political sphere is a touchy subject. Refugees are too often written off as “invaders” and degraded by government policies, mainstream media and even prominent social figures (I’m looking at you, Mr. Trump).

dvd-avatar-the-last-airbender-season-3-release-date-premiere-2015jpeg-318aa4_1280w

We’re too often exposed to ethnocentrism (basically evaluating other cultures based on the own pre-conceptions and standards of our own) and avoid exploring the perspectives of those within other cultures. Zuko, a former fire-nation prince, has to challenge these preconceptions in order to pursue what is morally right. The realisation that his almighty nation might be undergoing the wrong path, despite being fed the opposite his entire life, is fundamental to his character arc.

avatar

What Avatar does is presents stories of diverse people with different cultural backgrounds, allows us to empathise with them, showcases them as realistic – and often relatable – people, all within a media piece that isn’t necessarily an attack on post-modern society. It’s presented at base form as a story of a boy desperately trying to restore balance to the natural world. And I’m not even getting into the kick-ass animation yet.

Now, guaranteed, a Bachelor of Animation isn’t going to get me a one-way ticket into a director’s chair to write the next big morally-challenging media jam-packed with social commentary and progressive ideology…but it’s a start. It’s something I know I will enjoy, and will no doubt take my artistic journey to the next level. The pay is just going to be another bonus.

References

  1. Image retrieved from https://quantummultiverse.wordpress.com/dvd-avatar-the-last-airbender-season-3-release-date-premiere-2015jpeg-318aa4_1280w/
  2. Image retrieved from http://www.fanpop.com/clubs/avatar-the-last-airbender/articles/99446/title/zuko