Progress Journal 18T1.2
Week 2
This week I mainly tried to focus on completing the bulk of the remaining pre-production work remaining for our current pipeline project, and to get the foundation of the animatic due in the following week. Whilst I was preoccupied for most of the week, when awaiting lecturer feedback for the final strides of my pre-production work, I was able to squeeze in some personal work at the end on the weekend.
What have you made this week?
Rapid Production Project
Final round 3 concepts for the Rapid Production Project. Although I liked both designs equally, the feedback generally gravitated towards the left design; as it had a clearer silhouette and simpler design. In addition, this design had more uniform primitives, with emphasis on cylindrical and spherical form, rather than its blocky counterpart, which felt like an uneven blend of the two.
The second image was a lineless experiment to get a preview of the potential style used in the final sequence. Unfortunately, I found that I preferred the lined version over the experiment. Lecturer suggestions advised that I could perhaps change the lines to a lighter or “opaque” lining method, as the black lineart was too “blocky” and “overbearing.”


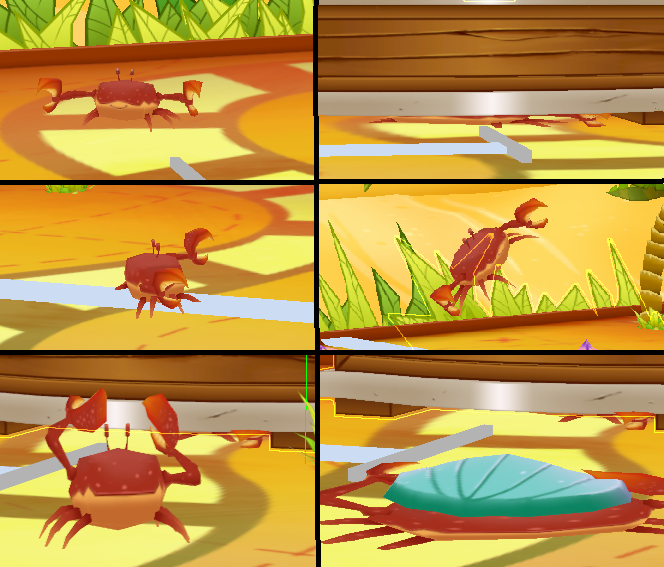
Miscellaneous sketches & expressions to get more of a “feel” for the character before diving into the animatic work.


Final character turnaround.
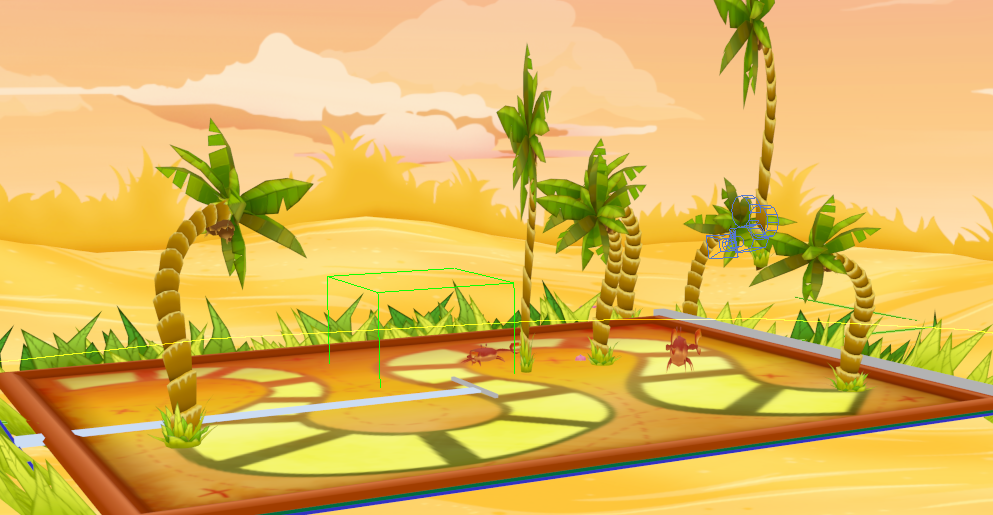
For the final round of environment concepts, I combined two previous environment concepts, and saturated the palette with deep reds and browns.
Although this was my staple for successive pre-production items, namely the layout map, I ended up doing another revision of my environment under lecturer suggestion. The values were too similar and made certain shapes hard to define from a distance.
I briefly changed the aesthetic of the scene with the addition of sharper primitives, particularly evident in the rock formations and addition of more stalagmites along the bottom foreground.
Whilst the left colour suits my intention of a fantasy-esque environment, it lacks the atmosphere generated by the second image. Perhaps with the accompaniment of foreboding music, or just by simply adding the audio, I will be able to achieve the proposed mood. Currently awaiting lecturer feedback to determine which environment will be used for the final product.
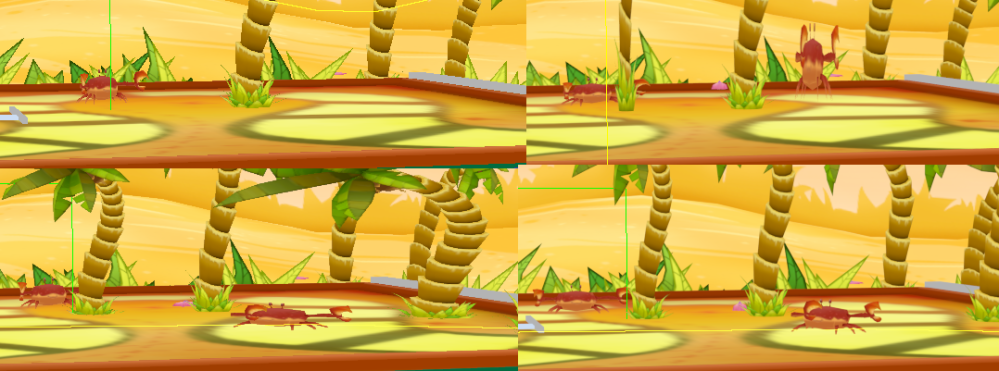
Self-explanatory: layout maps! These were based on the final environment concept at the time. May be revised in the future, but for now I’m content with leaving them as is, as the environment, aside from a few rocks and stalagmite/stalactites isn’t as complex as other people’s projects. The “final” environment concept has enough detail to be picture the majority of the layout, and its key features.
The layout maps were separated by shots, with the addition of a plain map detailing the assets / characters.
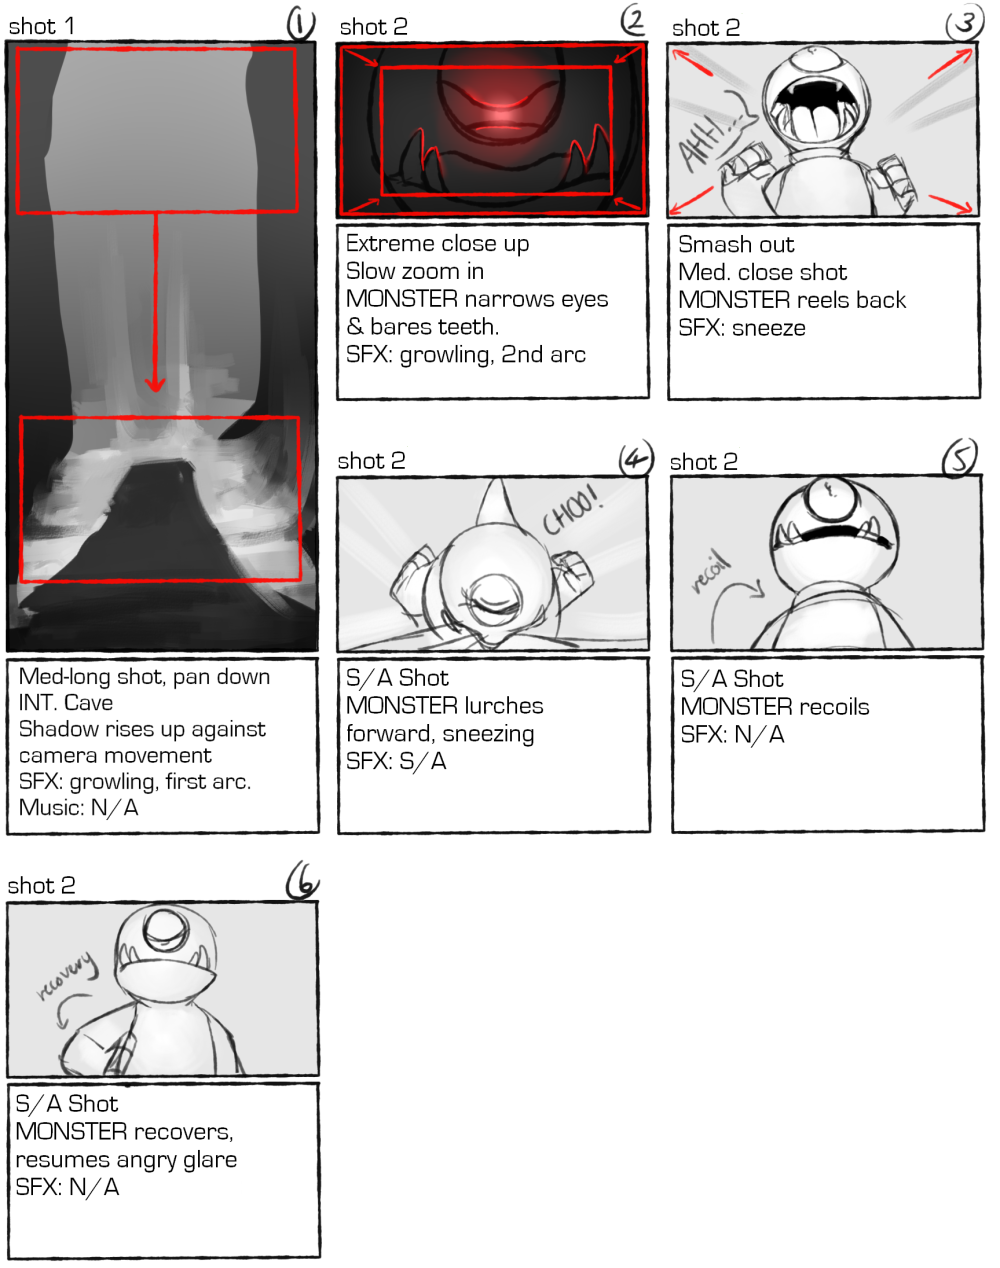
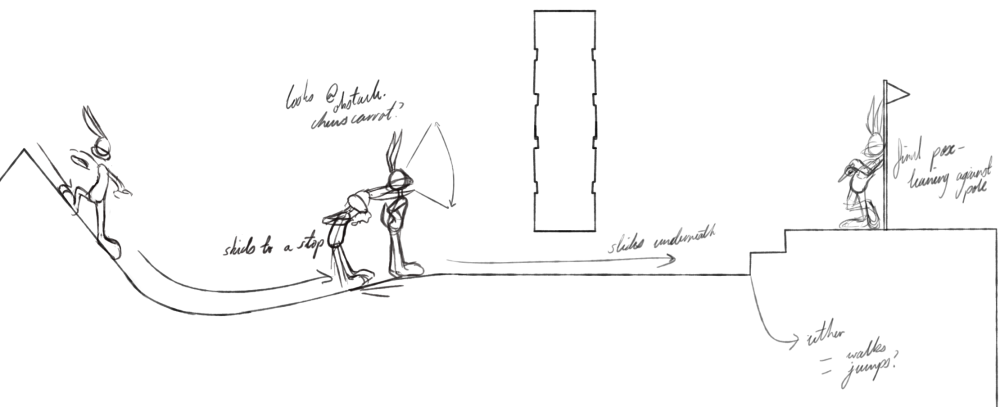
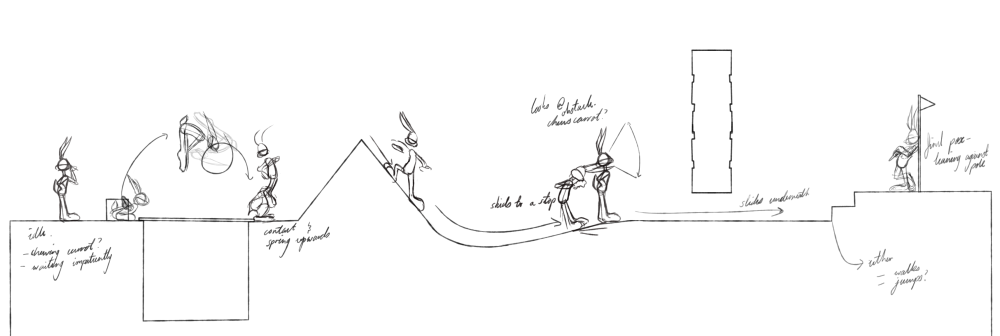
Based on lecturer feedback received, the storyboard was revised to include a different action and third shot. Rather than limiting the view with a single front-on shot for the majority of the last action, on the recoil and recovery, the camera will cut to a three quarter full / long shot to showcase the full form of the subject.
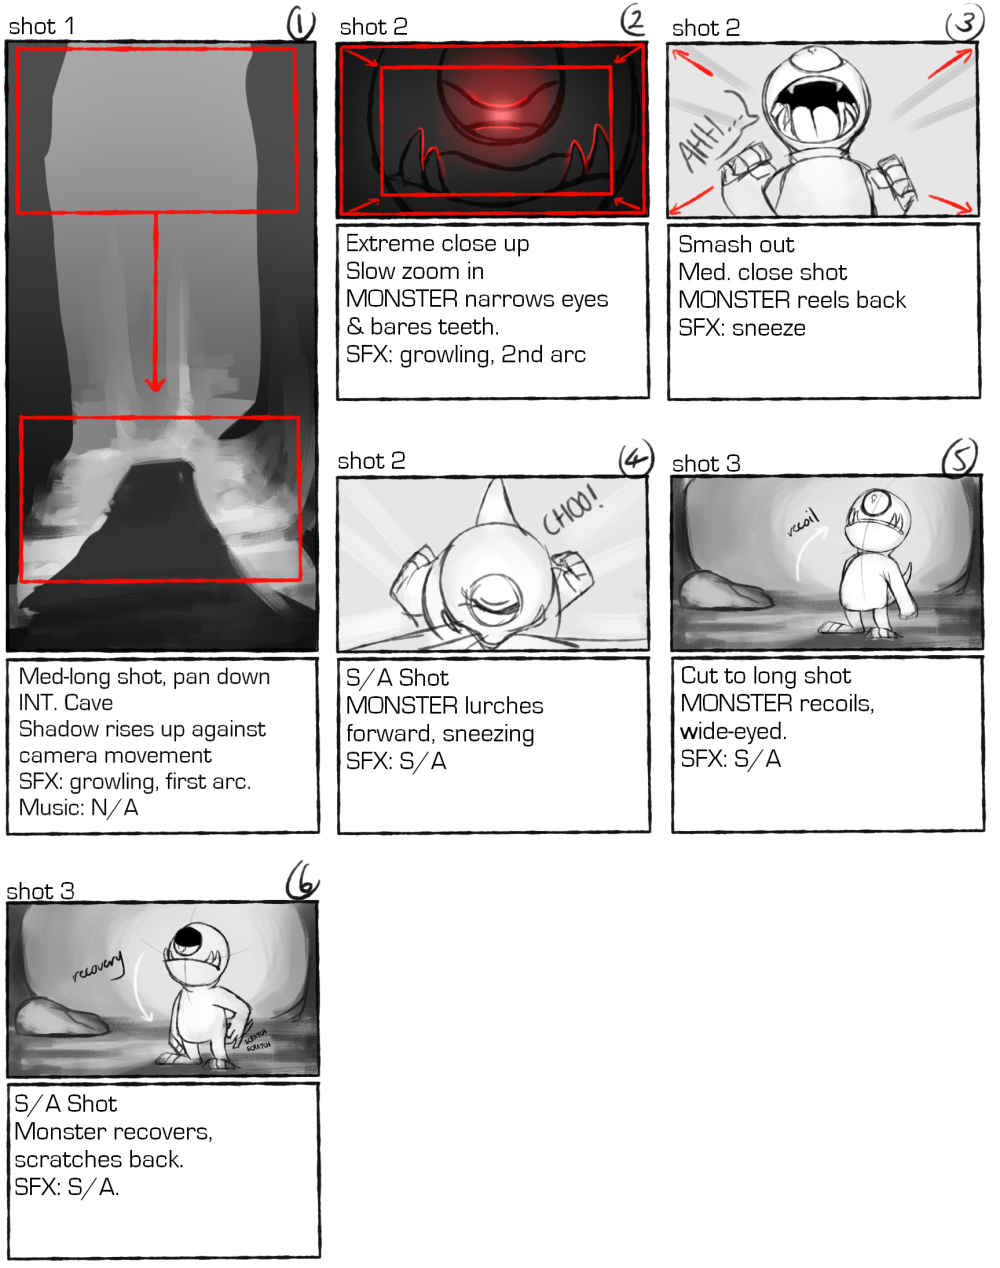
In addition, the last action was potentially too “mature” for the monster character. Instead of a hands-on-hip motion, the monster will scratch himself, perhaps with the new addition of a sound effect (although this may remain a desirable depending on availability of the SFX described).
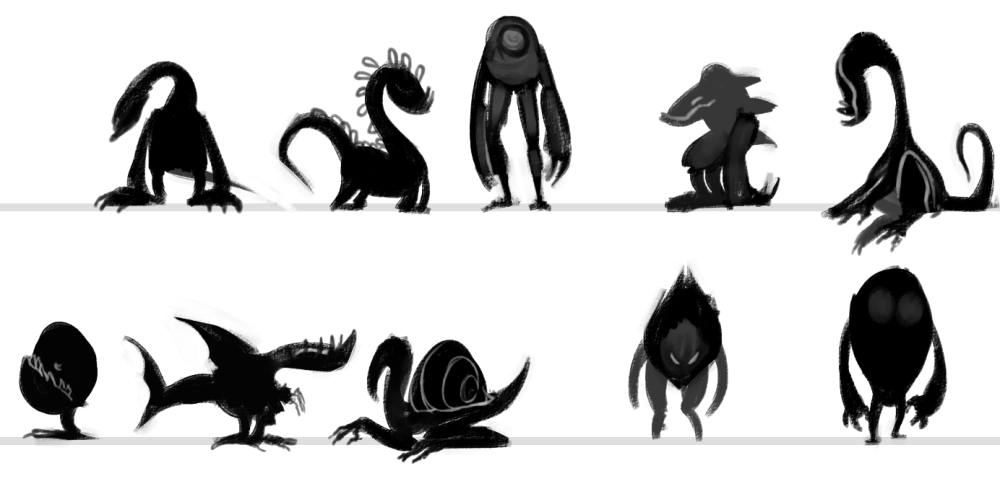
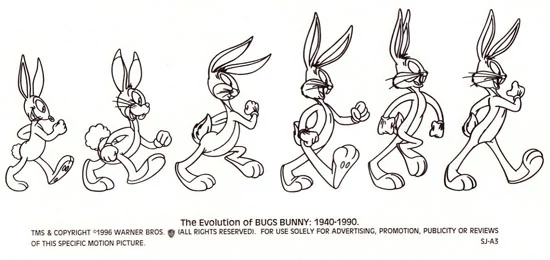
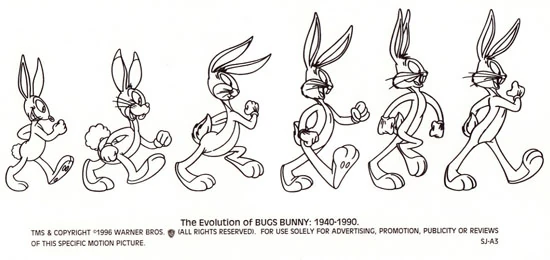
When compiling the last legs of my art bible, and revisiting the brief, I realised I had neglected to include the 10+ silhouettes desired for the round 1 concepts, which I had instead done a number of sketches for. To avoid any complications, I went back, basing the silhouette thumbnails based on the concept 1 sketches, and the evolutionary sketches used later in round 2. Several sketches along the bottom line where simply experiments with shapes, form and existing animal anatomy, and whilst interesting, did not really suit the narrative. Might use them in a later project or for some original work, as I particularly like the bottom-most left two, as well as the middle.
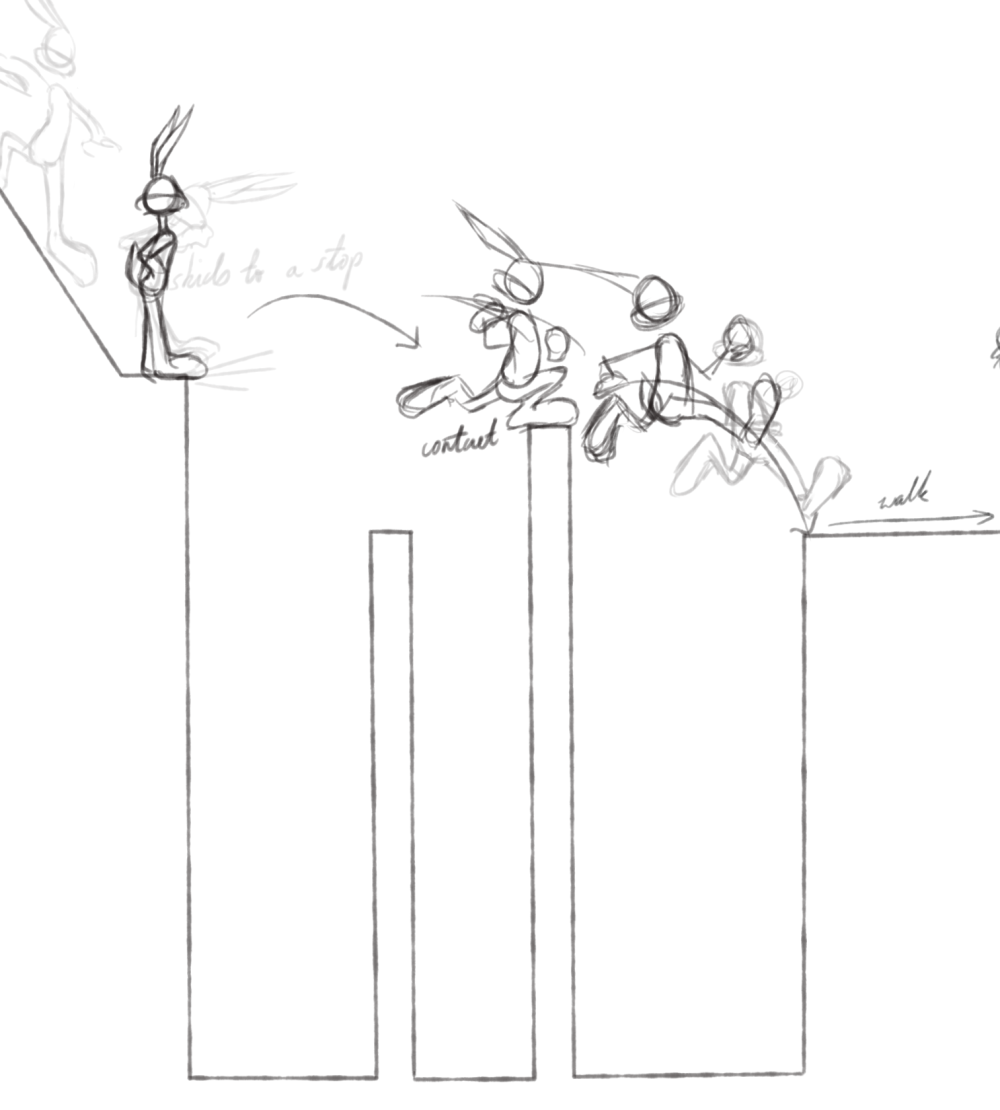
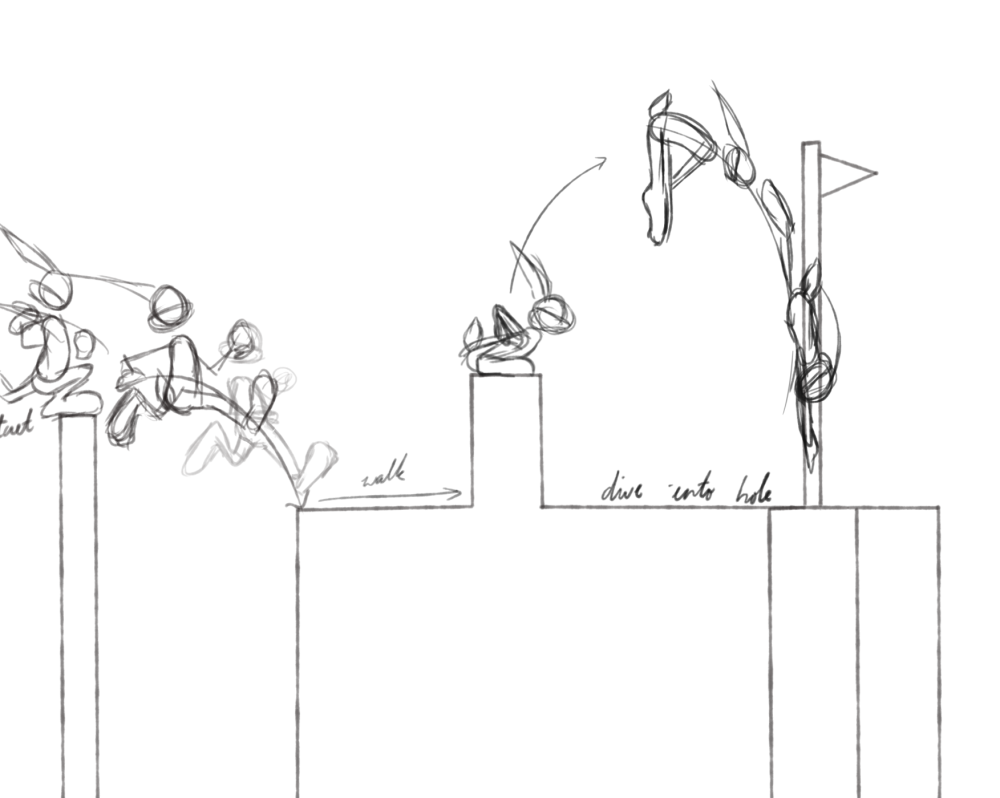
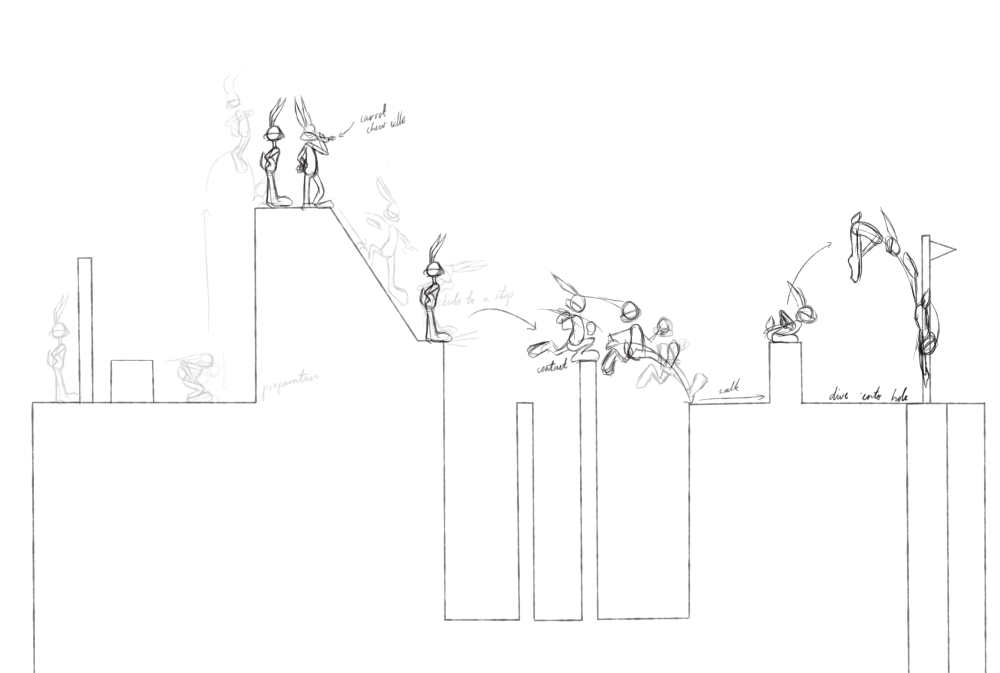
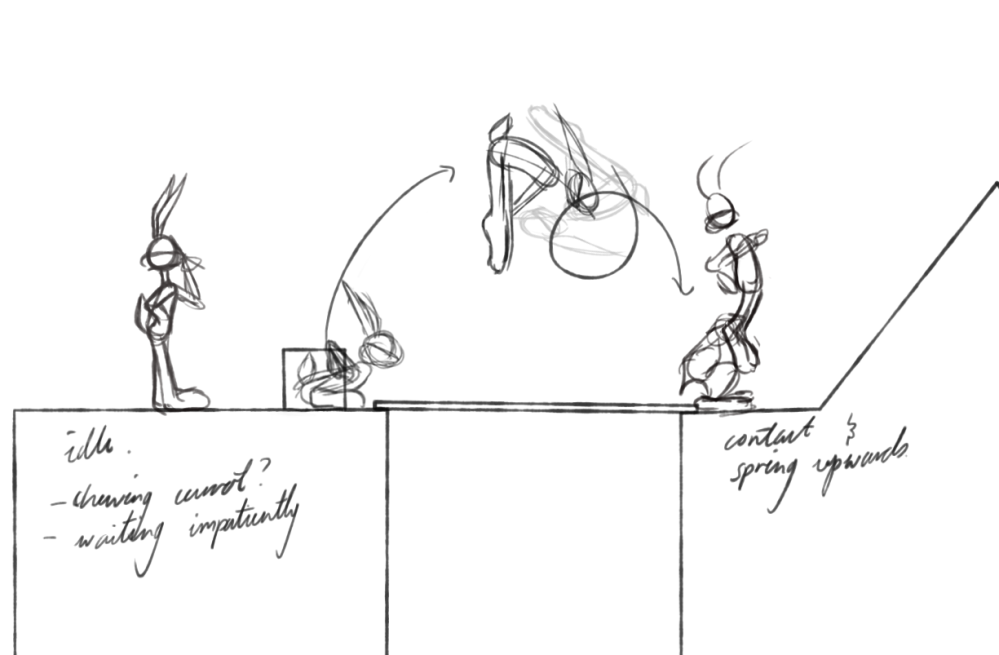
To begin work on the animatic, I set up the necessary file structure for Premiere and After Effect projects (as they do not directly import files, rather only references of where they are), and worked on the timing in the Premiere file, capturing stills of the storyboard to work as stand-ins for what will eventually be replaced with animatic / final footage.
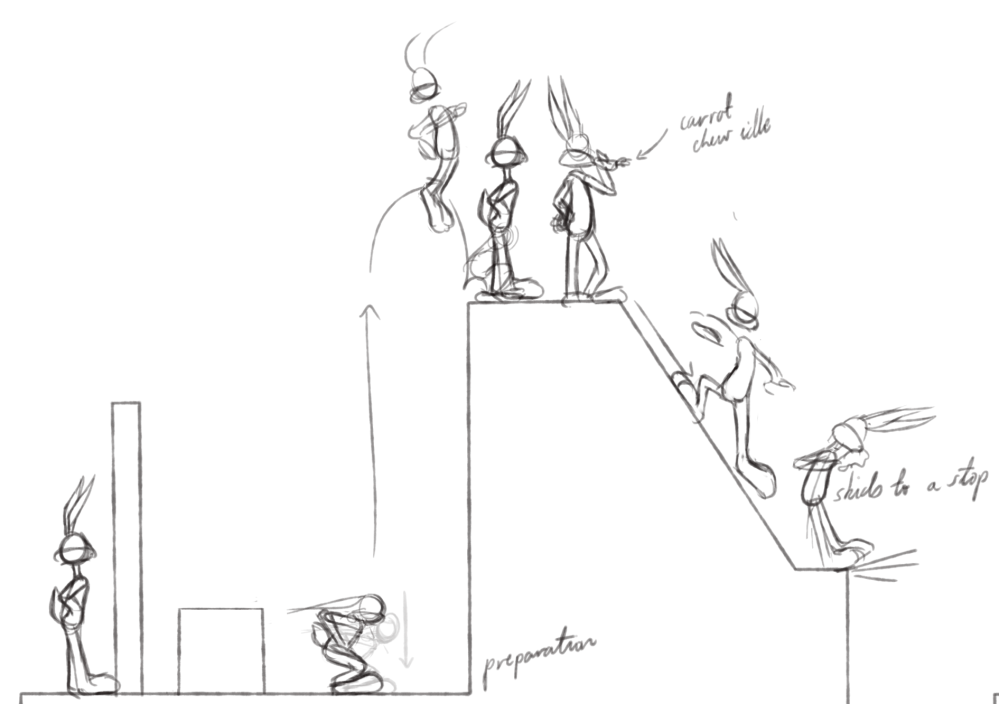
I additionally began work on stand-in rigs for the animatic:
Workshop: Rigging
Despite being chiefly focused on 2D rigging and animation for the current project, the workshop for basic 3D facial rigging seemed worthwhile enough to attend during Thursday’s class. Rather than focusing specifically on the CAT rig, as we had done in previous classes and assessments, we looked at creating a skeleton from scratch, modifying the bone geometry, structure, length, etc. with the Bone Tools interface.
Although the CAT rig is a good option for starting out, I found that it lacked the freedom of creating a rig from scratch and is bound by weight and other artificial limitations which incur a lot of time when having to edit manually. Even with the issue of having to free-form when creating the skeleton, it is a more viable option in the long run and can be applied to just about any model.


Before the skinning process, the bones of the rig were bound to several control objects, which are the staple of effectively controlling the rig. Applying control objects to the bones opens the gateway for manipulation of the model, etc. as well as the applications of constraints, several of which we applied during the duration of this workshop.


Most notably, limit constraints were applied to control the degree to which the position / orientation of the bone may be changed, as well as a “Look at” constraint, which bound the eye mesh to a control object. Whilst the mesh was parented to the body mesh, and moved in accordance with it, the assigned constraint meant that it moved in place to “face” the control object, serving as an easy method to change the direction of a model’s eyes. It is important to note that, when using this constraint, you must enable “initial offset” to preserve the eye’s original position prior to the addition of the constraint.
Unfortunately, due to an abrupt fire alarm practice, the workshop was cut short and we were unable to fully delve into the rigging of the mouth.
Specialisation Progress
During this week I intended to start working on my specialisation research, in order to prepare for the report due at the end of the following week. I spent several hours cataloguing research, as well as drafting up a research document for further topics to explore, potential experimentation, and preliminary research to include in the specialisation initiation report.
For this project, I found that, in particular, my environment and composition knowledge was sorely lacking, and thought it would be viable to delve into those areas before approaching a 2D animation project. This specialisation project will be split into two themes: composition, perspective and environment art, followed by After Effects experimentation, and other methods of 2D animation. This project will hopefully culminate in a small 2D animated product demonstrating knowledge of After Effects functions, the foundations of 2D animation and detailed environment compositions, achieving optimum visual interest.
Personal Art
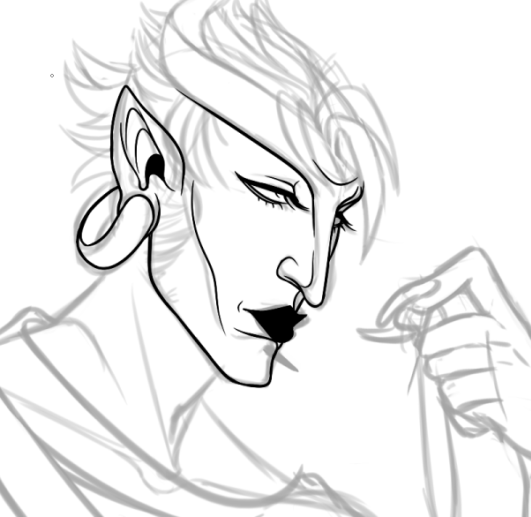

The above character is fairly new to my roster — and whilst I’m happy with their overall design, as seen here:

I find myself regularly revisiting smaller details, particularly their face shape, and other small details. I scrapped several sketches during the process, but believe that the second doodle will probably be their finalised design. The pointed nose / greasy-looking hair really helps to solidify the “trickster” look I was hoping to achieve.


Portrait of an original character, a mini-revamp. Mainly revised the structure of his face, colour palette and the shape of his horns. Experimented with colour overlays, as demonstrated by the two different versions.
What have you learned?
Viewed Resources
Workshop: Sub-division
Notes
- Subdivision is applied to a model to either add detail, or to potentially “smooth it out” and achieve optimum topology in a high-poly method (Autodesk, 2018)
- Although 3Ds Max offers three kinds of subdivision surfaces (OpenSubdiv modifier & HSDS modifier), the MeshSmooth modifier, or more commonly, Turbosmooth, are the most familiar and “easy” to work with. Turbosmooth
- Skin modifier BELOW subdivision modifier. Saves time skinning, unwrapping, etc.
- In order to attain sharp edges, add support loops near edges before applying TurboSmooth.
- Triangles and poles have a strong tendency to cause “weird smoothing artefacts,” but can be hidden by minimising their effect; most often done so by making their surface flat (completely, if possible) or by including them in closed off / tight areas in the mesh. For organic, humanoid models, triangle polygons are commonly stashed away in the armpits, groin, joints or “anywhere with natural creases in the surface,” (Holden, 2011).
AUTODESK (2018) Subdivision Surfaces. Retrieved on 15 Feb. 18 from https://knowledge.autodesk.com/support/3ds-max/learn-explore/caas/CloudHelp/cloudhelp/2018/ENU/3DSMax-Modeling/files/GUID-CB7FD47E-D809-429C-98D3-20CB56B72EBF-htm.html
Holden, D. (2011) Subdivision Modelling. Retrieved on 15 Feb. 18 from http://theorangeduck.com/page/subdivision-modelling
Rigging Workshop functions

- Animation –> Bone Tools
- Skeleton: Create bones. Start from the bottom. Deselect
- Bone edit mode. Zero out the bottom bone on the X axis.
- Look at constraint. Click Enable initial offset
After Effects | Character Animating
Plaskow, R. (2013) How To Make a Cartoon | For Beginners – After Effects Tutorial | Ross Plaskow [Video]. Retrieved on 12 Feb. 18 from https://www.youtube.com/watch?v=MX7lW8t4Jxcn
Notes
When animating a character specific to After Effects, in order to rig the limbs and facial features effectively each separate asset needs to be specific to a single layer.
Using the .psd file format allows for easy transfer between Adobe Programs, and in this case, from Photoshop to After Effects. The file retains all layers and assorted effects.
When using this method, it is a good idea to create a separate .psd file for the mouths of the character. For ease of use, make sure it is to scale in relation to the main file. (Make a “mouth guide” layer just in case you need to scale the mouths).
- Rotate the anchor point of each separate limb / etc. by pressing Y and dragging to a new area.
- Parent all assorted layers to the body to avoid rotating, positioning, etc. each individual layer. Highlight layers and parent.
- Alt + Right to shit keyframes and align them with ones on other layers.
- “Easy Ease” F9
- Anticipation movement.
- Mouth stuff:
- Put each mouth on its own frame so you can select whatever mouth you want by typing in the frame name.
- Composition settings à x number of mouths = x number of frames
- Highlight them all (alt + 1), then use the square bracket tool to make them one frame long individually.
- Shift + Left then enter.
- Enable time remapping (14:46)
Plaskow, R. (2013) How to Make a Cartoon | Character Animation – After Effects Tutorial [Basic Walk-cycle] [Video]. Retrieved on 12 Feb. 18 from https://youtu.be/ifCQYRF_c3k
After Effects
Puppet Pin Tool
“The Puppet effect works by deforming part of an image according to the positions of pins that you place and move. These pins define what parts of the image should move, what parts should remain rigid, and what parts should be in front when parts overlap,” (Adobe, 2018).
Adobe (2018) Animating with Puppet Tools. Retrieved on 12 Feb. 18 from https://helpx.adobe.com/after-effects/using/animating-puppet-tools.html
Time-remapping (mentioned in this tutorial)
“Speeding up or slowing down an entire layer by the same factor throughout is known as time-stretching. When you time-stretch a layer, the audio and the original frames in the footage (and all keyframes that belong to the layer) are redistributed along the new duration,” (Adobe, 2018).
Adobe (2018) Time-stretching and time-remapping. Retrieved on 12 Feb. 18 from https://helpx.adobe.com/after-effects/using/time-stretching-time-remapping.html
After Effects | 2.5D Camera/Layers
C.M. de la VEGA (2010) After Effects Tutorial – Create the 2.5D Effect [Video]. Retrieved on 17 Feb. 18 from https://www.youtube.com/watch?v=7Zf07_8qK6Y
Notes
- After Effects importing .psd file format: choose the composition option, merge layer styles into footage.
- Make a copy of your psd layer in After Effects, name it “reference,” and the original a 3D layer, by activating the 3D switch.

(retrieved from http://what-when-how.com/motion-graphic-titling-for-filmvideo-and-the-web/real-world-cameras-vs-cg-cameras-title-sequences-in-production-the-camera-and-the-edit-motion-graphic-titling-part-1/ ) - P for position. Place it into Z depth, place it closer to the focal point of the camera. S for scale; and sale the layer to fit the same size as the composition. Repeat process with other layers as desire, pushing back or forward depending on the composition desirables.
- New camera; 50 mm. New null object; named “Move Camera.” Parent the camera to the null object. P + Shift R to place key frames for the rotation and movement of the null object.
- Make sure to apply “easy ease in.” Action path can be found at Animation menu, then by going to keyframe assistant. Make sure the key frames are selected before applying this function.
- Blur a layer by heading to the Effects & Presets tab, search “fast blur,” put a value of 5 to blur a little bit of the background.
MrKlay (2014) Cartoon Animation Tutorial – Part 4: Make a Scene [Video]. Retrieved on 17 Feb. 18 from https://www.youtube.com/watch?v=Z1LzQhrC0PQ
- Work with transparent .pngs when importing files into a scene if possible; as .psd files incur a larger file size.
- Y to bring up and change the anchor point of a layer.
Animatic
Pre-Vis
Rotoscoping 2D Animation from 3D Pre-Vis
Storytelling in Environment Composition
- Adding in a hero element ( “an element in the painting that really sticks out and has a large focal attraction”) helps to add a storytelling component to a composition.
- e.g. lines and subjects pointing into the painting and to important focal points helps to draw the eye of the viewer to a certain area, if not already accomplished by the composition, enhancing (Feghali, 2018).
Composition
Blender Guru (2014) Understanding Composition [Video]. Retrieved on 15 Feb. 18 from https://www.youtube.com/watch?v=O8i7OKbWmRM
Notes:
- Broken down into a hierarchy of needs: Focal element, structure, balance.

- Focal point:
- Something that the viewer is drawn to immediately; the focus of the entire composition. A strong focal point helps to “ground” the viewer.
- Altered by contrast, saturation, scale, lens focus, motion blurring, lighting, etc.
- Structure:
- The organisation of elements, usually based on a rule
- e.g. rule of thirds, golden ratio, pyramid, symmetry, full frame
- Balance:
- Ensuring the visual weight of the image is evenly distributed
- Visual weight includes the size, contrasting elements, saturation and faces of figures of the image, usually dictated by a horizontal / vertical line. Must be weighted evenly on either side.
Perspective
Paolo Uccello
Perspective Study of a Chalice
circa. 1450
Pen on Paper, 29 x 24 .5 cm,
Uffizzi Gallery, Florence
- “The Italian master, Paolo Uccello, epitomizes the rebirth of pictorial space that took place during the Renaissance through the use of perspective illusionism. Uccello and his fellows incorporated the math of perspective vanishing points to render the third dimension into their art works.”
Retrieved from http://www.abstract-art.com/abstract_illusionism/ai_03_put_into_persp.html on 17 Feb. 2018.\
Catalogued Resources
https://fox-orian.deviantart.com/art/Perspective-Composition-Pt-1-118068853
Schleifer, J. (2011) Animator Friendly Rigging: Creating rigs that don’t bite. Retrieved from http://jasonschleifer.com/afr/
Specialisation:
- Feghali, W. (2017) The Keys to Great Compositions in Digital Painting: Understanding & Improving Your Compositions. Retrieved on 13 Feb. 18 from http://www.evenant.com/design/the-keys-to-great-compositions/
- Izzo, R. (2018) Mastering Storytelling: With artwork by Disney artist Luca Pisanu. Retrieved on 13 Feb. 18 from http://www.evenant.com/design/mastering-storytelling/
- Feghali, W. (2018) Painting Environment Concepts in No Time. Retrieved on 13 Feb. 18 from http://www.evenant.com/design/painting-environments-in-no-time/
- Feghali, W. (2016) A Tip On Painting Massive Environments. Retrieved from http://www.evenant.com/design/painting-huge-objects/
- Greyson, E. (2017) PAINTING Studio Ghibli Backgrounds – Digital Painting Process [Video]. Retrieved on 10 February 2018 from https://www.youtube.com/watch?v=n89jrrW2-TQ
- Feghali, W. (2016) Digital Painting Basics – Introduction to Speed Painting – Concept Art Tutorial [Video]. Retrieved on 10 February 2018 from https://www.youtube.com/watch?v=bDXQ8crU2hk
- Ward, P. (2002) Picture Composition. Taylor and Francis. Retrieved via https://ebookcentral.proquest.com/lib/saemulti/detail.action?docID=297073#
- Glebas, F. (2013) The Animator’s Eye: Composition and Design for Better Animation. CRC Press. Retrieved via https://ebookcentral.proquest.com/lib/saemulti/detail.action?docID=1181017&query=composition
Toggl Report
https://drive.google.com/file/d/1yEKbJlR6gT8whXc75512T_ZBHcmhKqND/view?usp=sharing


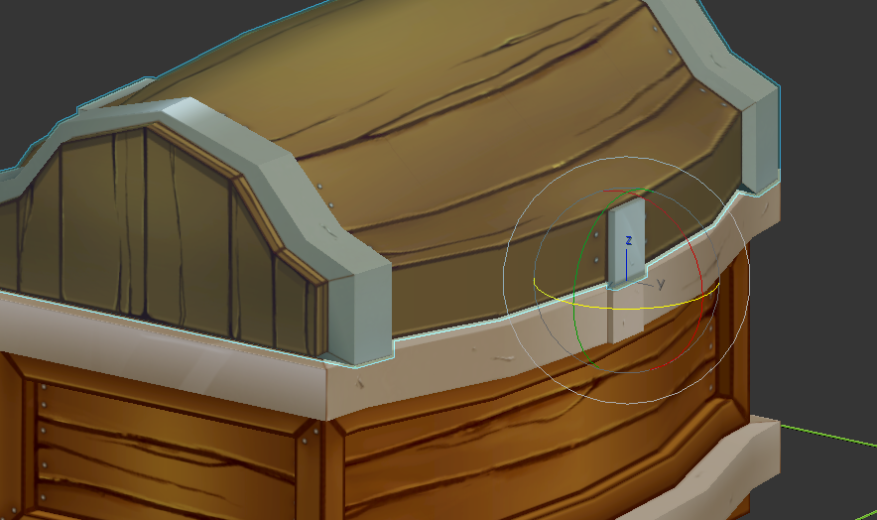 …allowing for the opening of the chest…
 …I went on to link the bottom of the chest onto a “control” object (basically allowing me control of the entire chest) and then the base to the lid. The result is a hierachy of joints in which the control object is the parent or “root joint,” with the remainder linked to it. In essence, you move the control object and everything else follows, whilst if you moved the lid, it would not have any influence on the other joints. That’s the rigging done!


